
FIT REDEFINED
Mastering Negative Ease: A Designer’s Guide to Perfect Intimate Apparel Fit
As designers in the intimate apparel industry, we know that achieving the perfect fit is a true art form. It requires a deep understanding of techniques and approaches that can uplift our creations to unparalleled heights. One such technique that holds incredible potential is negative ease. In this article, we’ll talk about negative ease and explore how it can help us design impeccable intimate apparel pieces. So, fellow designers, start-ups, and entrepreneurs, let’s unlock the secrets of mastering negative ease together!
UNDERSTANDING NEGATIVE EASE: COMPRESSION AND RESHAPING
Mastering negative ease is our secret weapon when it comes to providing unparalleled shaping and comfort in intimate apparel. It refers to a design technique where the finished garment is intentionally smaller than the body measurements it is intended to fit. In other words, the garment is designed to stretch and provide compression when worn, creating a snug and supportive fit.
TESTING FOR NEGATIVE EASE: REFINING THE FIT
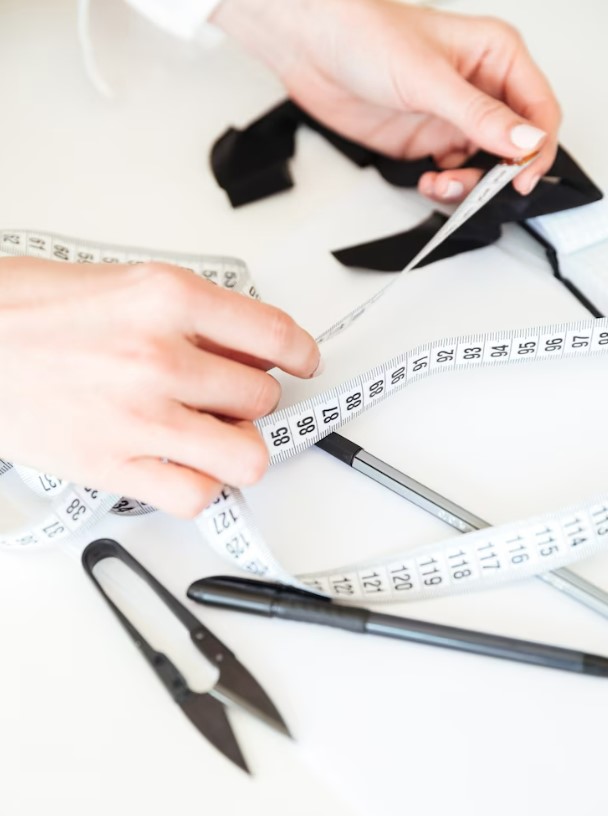
To truly master negative ease, we need to roll up our sleeves and put our designs to the test. Our focus lies in areas such as the waistline and the stomach/lower abdomen, where figure control is paramount. By involving live models in our testing process, we can gather valuable feedback on the comfort and effectiveness of the elastic compression.
Here’s a step-by-step guide to conducting negative ease testing:
- Take a fabric strip, approximately 15 cm wide and slightly longer than your model’s natural waistline measurement.
- Gently wrap the fabric around the waistline, allowing it to stretch and overlap until you reach the desired level of shaping and comfort. Let’s say you stretch it to 56.7 cm and find that it provides the perfect compression and fit. Mark the fabric at this precise point to capture the perfect fit.
- Proceed to the hip/bottom area and wrap the fabric strip, stretching it to the marked points and evidently assess whether the elastic stretch feels acceptable for the intended garment.
- Make adjustments as necessary to strike the perfect balance between control and comfort.
DETERMINING THE SCALING FACTOR: CRUNCHING THE NUMBERS
Now it’s time to get a bit mathematical. The scaling factor is our trusty tool for determining the ideal negative ease measurements. Furthermore, it’s all about finding the magic number that will guide us in creating patterns for our garments.
Here’s a breakdown of the process:
- Measure the distance between the marks on the un-stretched fabric strip. This measurement represents the negative eased fabric needed at the waistline.
- Divide the length of the stretched fabric by your model’s natural waistline measurement. The result is the scaling factor.
- Apply the scaling factor to your model’s natural body measurements. Multiply it by measurements such as the top hip and hips to obtain the negative eased pattern measurements.
Imagine a fabric sample in its natural state, untouched and at rest. At this point, we can say it has 0% stretch. Now, picture stretching that same fabric to its maximum limit, where it reaches 100% stretch. Somewhere between these two extremes lies the sweet spot – the precise amount of stretch that grants us the desired garment shaping while ensuring comfortable freedom of movement. It’s finding that delicate balance that brings our designs to life.
EXAMPLE:
Length of stretch fabric = 56.7 cm
Models natural waistline measurement = 68 cm
56.7 divided by 68 = 0.83 = the Scaling Factor number.
For the other “around the body” measurements:
Scaling factor 0.83 times by the model’s natural body measurements, i.e.,
0.83 x 88 cm top hip = 73.3 cm pattern measurement
0.83 x 94 cm hips = 78.3 cm pattern measurement.
So the garment “around the body” measurements would be:
Waist: 57 cm
Top Hips: 73.3 cm
Hips: 78.3 cm
Certainly these are the measurements you would use to draft the garment pattern with, and these are the garment measurements that the garment is going to try to compress the wearer’s body to.

UP AND DOWN BODY MEASUREMENTS: FINE-TUNING FOR PERFECTION
While negative ease primarily applies to “around the body” measurements, it’s worth considering a touch of negative ease in the up and down direction to ensure a smooth fit. By conducting further testing and utilizing a scaling factor of approximately 0.97, we can refine our designs to achieve flawless results.
Unlock the potential of negative ease in intimate apparel design, combining remarkable shaping and comfort. Through fabric testing, scaling factors, and careful consideration of measurements, achieve the perfect fit your customers crave. So let’s continue to innovate, experiment, and push the boundaries of design. Together, we can create intimate apparel that empowers individuals, celebrates their unique curves, and makes them feel exceptional. Let negative ease be our guide as we craft extraordinary garments that embody style, support, and confidence!